Locating Unit Week 5
Although week 5 was mainly focused on the trip to Florence,
I still managed to make some progress with my development work on Monday and
Tuesday.
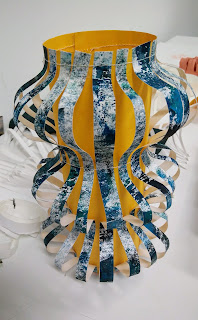
I continued manipulating my 3D paper structures, stitching
into some of them on the domestic sewing machines. I encountered a few problems
when doing this, as I had to make sure the tension on the machines was just
right, to ensure the thread didn’t break or get tangled and the paper didn’t
tear. One of the issues with stitching into paper is that the holes from the
needle are obvious and hard to cover up, so any mistakes can ruin the sample.
Fortunately, I only had problems with the tension on one sample and could cover
up this when I folded the structure. I really like using sewing machines to
stitch into paper. For one thing they help to hold the paper together better
than glue or double-sided tape. But I also like the contrast between the
handmade qualities of the paper and the technical, machine elements of the
sewing machine. This theme of combining technology with handmade re-occurs
often in my work.
 |
| Stitched paper 3D structures. |
For the FFF project, we learned how to do button holes on
the domestic sewing machines. It was quite tricky at first, especially getting
the button hole the right size and making sure all the sides were the right
length and matched up. I ended up doing loads of practices but I was pleased
that I didn’t rush it as when I eventually put the button hole on the collar I
had made, I think it looked reasonably okay! This was another aspect of the
pattern/cutting, garment making process which I took my time over. I am glad
that I took it slowly and made sure I understood how to do it. Having never
made a garment properly before, I want to use this opportunity to get the
basics under my belt, so it will be easier to adapt my knowledge to other
projects in the future. I imagine I may make 3D printed buttons to use on my
final collar design, so being able to do neat button holes will be important.
On Tuesday I got on the laser cutter again which was really
exciting. I loved being more adventurous in the last unit and used the laser
cutter on several occasions to cut felt and leather. This time I used Perspex,
as I wanted to take some of my paper designs into new materials. I’ve never
worked with plastic before and I thought it would lend itself well to my
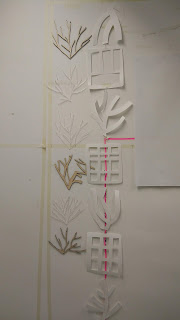
cut-out design which came from studying the shapes created by my 3D structures.
The result was very satisfying and I loved seeing my two-dimensional paper
design take on 3D qualities. I am drawn to the versatility of Perspex for the
same reasons I like working with paper; it’s easy to manipulate into new
shapes. I now want to make more Perspex samples, in colours appropriate to my
colour scheme and with new designs. I plan to heat my samples and mould them
into different shapes.
 |
| My two screens for paper printing. |
I also created two screens of the positive and negative of
my cut-out design so that I can get into the paper printmaking studio next
week. With the plan of creating wallpaper for my final outcome, I want to start
using the paper print facilities and experiment with layering designs. I also
want to see how my colour scheme works out of my sketchbook.
One thing I didn’t manage to do this week was any more
large-scale drawing. I hope to do more of this next week, to get ideas for new
wallpaper print designs.


Comments
Post a Comment